A.A.R.G. Journal No. 4
February 1999

Editors Message
Rebreathers are considered by many divers to be a 'futuristic' type of diving equipment when in fact they are one of the earliest types. Many changes have been made to the basic principle of rebreathing your own gas for life support in various environments. Being less than a year away from the turn of the century, the big 2000, which has been depicted in many books and movies as a futuristic time, it is interesting to note the advances made and the problems we still face in rebreather design and diving. Rebreathers have often been promoted as 'the next wave' in recreational diving and as we approach the year 2000 this is slowly becoming a reality with the growth in popularity first inspired by the Drager Atlantis, the introduction of the Inspiration CCR, and the new 'budget' versions of the Halcyon and Drager. As far as rebreathers go we certainly do live in interesting times, which is not necessarily a good thing according to Chinese folklore. It will be interesting to see if the inherent dangers of all rebreathers can be successfully overcome in the future. For the moment we still must rely on good training from an excellent instructor and an ongoing self education. There is no 'magic carpet' but maybe in some future time, everyone will be diving a small compact rebreather and open-circuit gear will become a part of history like the twin hose reg. In this issue we have the continuation of our series on the Electrolung CCR, stories of amazing dives currently being done on rebreathers, and other information.This edition of the journal was delayed due to the Christmas holidays.
Closed Circuit Rebreathers in Vanuatu
by Peter Heseltine
12/4/98 Santo, Vanuatu.
Mixed three tanks of heliar 15/36 last night from the single tank of balloon helium shipped from Australia last month. This is in addition to my own pony of 12/50 heliar. Without a Haskell, this was about all I was able to get from the tank.
Today's dive will (we believe) be the first trimix used on the Coolidge and certainly the first trimix rebreather dive. Kevin Green of Aquamarine diving and "Diver Bob" will accompany me on this "Discover Trimix" dive. The President Coolidge, well known to Australian and other divers and the subject of a photo essay by David Doubilet in a 1988 National Geographic, was sunk by "friendly" mines on 26 October, 1942. In an attempt to beach her on the shore, the ship hit the reef and in 90 minutes rolled and sank into the Segond channel. All but two of the more than 5,000 aboard were saved, but the huge cargo of war materiel was lost. She now lies on her port side in 70 - 240 fsw. At 654' in length, the Coolidge is reputed to be the world's largest "sport diver accessible wreck". One of the last great ocean liners, she had many innovations including screws powered by electric turbines. Peter Stone's book "The Lady and the President" gives a full account of her life, death and subsequent salvage diving. The profile is to descend to the shark cage - next to the sea-door - at 80 fsw, switch to mix and then proceed along the starboard side to the stern, which slopes to 140 fsw and then drop down the stern below the rudder to the sand at about 230 fsw. While this is not an exceptionally deep dive and the guide, Kevin Green of Aquamarine, regularly does it on air, we agree that this may be the first time he remembers everything he sees!
Actual dive: 10am We descended to the sea door and shark cage to find a significant was blowing against us. The other two switched to OC mix (one of the twin 80 doubles they carried - the other being air) and I discovered that I had a leak in my off board connection and was down to about 1200 psi in the 20cf pony of heliar.
I figured I only needed about 2-3 loop fulls to flush and would get down OK. On the way up I wouldn't need any more heliar and had plenty of air diluent, so I switched too. My voice check told me I had enough mix.
We swam (against the current) down the starboard (upper) side of the ship and then dropped over the edge of the stern at about 160 fsw. On under the rudder examining the prop shafts. During one salvage effort for the bronze screws, they had actually used explosive charges which virtually welded the screw to the shaft, instead of cutting it. It cost them another month in Santo. Maybe not such a mistake? I had dropped down to about 10fsw above the sand (218fsw) and filmed the others coming down rudder and then crossing to the (vertical) stern deck (the ship lies on it's port side) The size of the ship became truly apparent - the stern at its beam rises about 80 fsw out of the sand.
We then swam along the deck, noting the rear telegraph, the stern 5" gun and the swimming pool (It was full! ;-) and then back over the starboard rail and up to the shark cage. We had left spare tanks there, for which Diver Bob was grateful. He had used his mix fighting the current now coming against us - again - and had to switch back to air at about 100fsw.
Apparently the first current was created by being close to shore, the second by the tide. Weird. We did stops at 60, 40 and 30 and then 20 for a total of 32 mins deco - run time 78mins. From 40 on the other two used EAN50 - the 20 and 25 fsw stops they use are filled with little critters who put on a great show, so they used a lighter mix and avoided pitfalls if they fell asleep in the bath temp water and slid down the slope with EAN80. They went through all their mix, about 1/2 to half their air and a couple of bottles of EAN50. Kevin Green did spot - and remember - some new features about the stern , including a locker he had not noted before. Altogether a good dive, even if a bit wimpy by some standards, but remember the nearest chamber is in Townsville, Oz - a looong way away
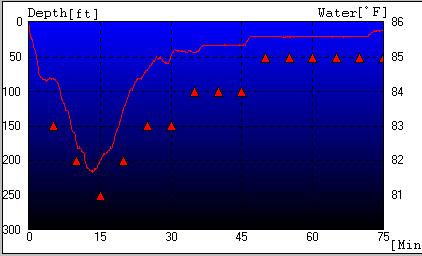
The following are the gas mixes and profile (PH) used on 4 Dec 1998 to dive the stern of the President Coolidge - likely the first use of a rebreather and helium/trimix in Vanuatu: All OC divers cylinders pressurized to 230 bar
Peter Heseltine: [P] BioMarine CCR1000 (commercial version of Mark 15). Diluent side is plumbed to accept and switch to off board gas. On board diluent: air; off board 20cf tank heliair 50/50. Setpoint pO2 1.2 ata for dive, 1.6 ata for deco.
Kevin Green [K] (Aquamarine, Vanuatu) Independent backmounted aluminium 80's: one air and second tank He/O2 41/18 (END 105fsw). Drop tank (80cf) of air at 80 fsw and EAN50 at 40', 30', 20' and 15'
"Diver Bob" [B] Independent backmounted aluminium 80's: one air and second tank He/O2 51/16 (END 79fsw) Drop tank (80cf) of air at 80 fsw and EAN50 at 40', 30', 20' and 15'
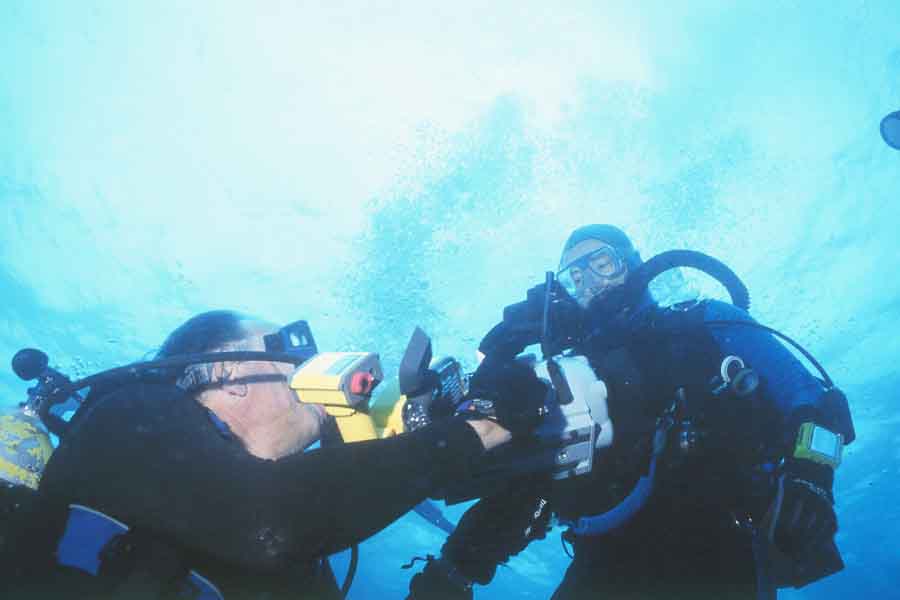
Peter Heseltine decompressing after the dive
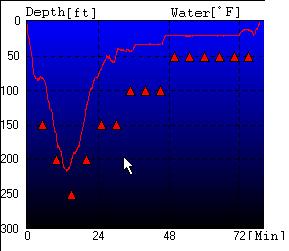
Profile:
Elapsed B&K P
Time (Mins) Depth (fsw) Gas diluent pO2
0 Surface air air 0.8
2:20 80 air air 1.4
5:40" 80 trimix 50/12 1.2
13:15 217 trimix 50/12 1.4
26:30 80 trimix 50/12 1.2
29:25 60 air air 1.2
30:35 40 EAN50 air 1.2
35:50 40 EAN50 air 1.6
36:30 35 EAN50 air 1.6
45:40 35 EAN50 air 1.6
46:50 21 EAN50 air 1.4
71'25 21 EAN50 air 1.4
72:55 15 EAN50 air 1.0
76'55 15 EAN50 air 1.0
78:50 0 air air 0.2
Rebreather Information Night
On Saturday, Nov. 28th, 1998, 7.00pm at Southern Cross Divers, 255 Stanmore Rd, Stanmore, we had our first rebreather meeting with Joe Dituri from Hawaii presenting a most informative talk to a group of rebreather enthusiasts and interested divers in Sydney. Joe was only out here for a week but in between sightseeing and feeding wild Kangaroos managed to fit in some time to talk to us. His 1 hr presentation covered all the basics of rebreather design, or how they work, for those who knew little about them or only the basics, as well as maintaining the interest of the many well informed RB divers present. He discussed how the various changes to parts of a rb can effect performance ie. different bag placement, gas addition etc. He also discussed the many safety issues one must be aware of before diving a certain design.The latter part of the talk involved Joe presenting a number of questions to the audience to get them thinking and open the floor for discussion. Questions such as, "What is the most important part in a rebreather?" and "What level of prior training, if any, should be required before rebreather training?", brought forward a number of interesting issues and viewpoints from the audience. All in all a most interesting and professional presentation which managed to raise the awareness of everyone there.
After the talk we had a BBQ and some beer and lots of interesting discussions on all sorts of diving related issues. We still weren't able to totally convince Joe he should be diving heliox all the way but Jason Rodgers and Joe did have an interesting conversation on gas physics and gas choice.
A number of rebreathers were there including:
Barry's Inspiration, which looked like it had been used alot but not cleaned in a long long time;)
My TopGun, which now has an excellent new mouthpiece which I can shut off with one hand thanks to C2 Developments, a new supplier I have found.
Jason McHatton's FGG (semiclosed, originally designed for deep water bailout to a bell) for which he has built another scrubber with O2 sensor so he can dive trimix.
Jason Roger's homebuilt SCR which looks most unusual with a ffm and various suspect looking features ;)
Bruce Stewart's TP-2500. Perhaps the highlight of the night! Yes, he has paid Will Smithers squillions for the rights (well we assume Smithers will demand squillions when he finds out), and copied the TP-2000 design but modified it. A great design for a bailout which can only be truely appreciated when you see one in the flesh. And those tp rolls in the breathing bags sure do make you feel assured that you are covered for any unexpected emergencies
Paul Davis from Drager was also there with a Dolphin and we passed the scrubber round during that section of the talk covering scrubber design. It certainly is quality manufacturing.
A number of other homebuilders and divers were there including;
Dave Apperley who is currently preparing to dive his Inspiration on the 'Niagra' wreck, in deep water off NewZealand, and the Pierce Resurgence. (see article further on in this issue)
Paul Anguin, who is in the process of building his breather.
Brendan Halliburton who is currently using one in a dry caving environment to get through CO2 soaked sections of the caves he is exploring.
I know everyone that attended would like me to thank Joe for taking the time out of such a short holiday to talk to us and I know everyone got something out of the night. I'd also like to thank his beautiful and charming wife Amy for putting up with all the blokey rebreather talk. Finally, thanks all those people who were there for making it such a fun and interesting night. It certainly was a blast to finally put some faces to names and to hear about their different diving experiences. Thanks to Barry Hallett too for putting on an excellent BBQ and providing his premises for the event. We'll definitely be having another AARG get together sometime in the future.
A lesson learned: Unfortunately I learned a lesson in electronic failures when I tried to download the photos I had from the digital camera I had borrowed. The batteries died and erased all the photos from the camera as I tried to download them. I guess electronics aren't even reliable for taking photo's of rebreathers.
Some Guidelines for the Design of Recirculating Underwater Breathing Apparatus.
By Rodney Nairne, AARG.Unfortunately the use of jargon is hard to avoid in the discussion of rebreathers, so you will need to have a good grasp of the terminology. Also, for the sake of brevity I have deliberately skipped detailed explanations of the components and functions of generic rebreathers. Look elsewhere for that! It's out there! Besides if you don't know what I'm talking about here you need to step back a little and get some background info first.
Mouthpiece:
- · Keep the bore at least 25mm, preferably 35mm to reduce breathing resistance.
- · Keeping the bore below 45mm avoids severe buoyancy problems and associated jaw fatigue.
- · Minimise the dead air space between the 2 check valves by keeping them close together
- · O-ring seals are not preferred, as they are designed to seal under a significant pressure differential. You can make them work, but fine tolerances are required, and they will always be prone to extrusion, and frequent relubrication. If they are exposed during the operation of the valve they have an opportunity to extrude.
- · A gasket or interference fit seal is to be preferred.
- · The check valves must be resistant to inversion, to avoid rebreathing carbon dioxide
- · Ensure the material used is not prone to shrinkage with age like the early atlantis units.
- · Ensure the material does not warp with high temperatures if you plan to wash your loop with hot water.
- · Often, a reduction in the modulus (stiffness) of the check valve material will yield lower breathing resistance than a larger diameter check valve. This is at the possible higher risk of check valve inversion.
- · Always keep a reasonable clearance for the correct operation of the check valves. You need to have clearance in the bore, and also clearance downstream to ensure the valve does not touch any other component.
- · 25mm (1 inch) clearance or more downstream clearance gives a better path for gas flow than a sudden decrease in diameter or the start of the convoluted hose.
- · Smooth bore hoses have lower flow resistance, but you will need corrugated hose at the mouthpiece for flexibility.
- · Keep this hose bore above 25mm ideally around 35mm. Larger bores create buoyancy problems.
- · Should be large enough to provide a full breath.
- · Useful secondary function is as a water trap.
- · Smooth inner surface makes for easy cleaning; i.e. nylon coated wetsuit neoprene is a poor choice.
- · Ideally you will use a material that can double as it's own gasket material, so you don't need glue or sealant on your bag attachments.
- · Heavy weight bag material will not always lead to significant increases in breathing resistance, as is commonly believed. Ultimately the shape and positioning of the bags will have a greater effect on the breathing resistance.
According to the Molecular Products, the inter-granular space of the canister should equal the volume of a normal breath (or 1/2 a normal breath in the case of the split counterlung). Assuming a 3l normal breath, and the advertised inter-grannular space of 40% of the volume of the scrubber material, single bag counterlung units would have to have 3/0.4 or a 7.5l capacity scrubber! In the same case the split counterlung requires only a 3.75 l capacity, which is about the optimal volume if you consider overall package size. Larger volumes require either radial* or big bore canisters to both accommodate the volume of material and keep the work of breathing reasonable. These two options are often rejected for reasons of complexity of manufacture and physical size respectively. (Note the Cis-Lunar uses radial flow, and the MK16 has a modified big bore canister.) According to information provided by Molecular Products the aspect ratio of simple cylindrical scrubbers preferably should be 1 to 1.75 to 1, with a diameter of about 6 inches.
* Axial flow: imagine a pipe, with gas flowing through it from one end to the other. This is axial flow as it is parallel to the axis of the pipe. The surface area is cross section of the tube. Breathing resistance is proportional to length of the bed along the axis of gas flow and inversely proportional to cross-section.
*Radial Flow: Imagine the same tube but with two inner tubes: a small central tube and a large tube, which leaves just a small gas space between it and the outer tube. The two inner tubes have holes to allow gas transfer. In this arrangement the gas enters along the outer and 1st inner tube, passes through the scrubber bed along the radius of the canister, (i.e. the gas flow through the bed is at 90 degrees to the flow in the axial scrubber) into the central tube and out. This arrangement gives a lot more cross sectional area and a shorter path for the gas through the scrubber bed. The gas velocity is also reduced over the axial design, due to the larger cross sectional area.
Here is an example: Assume a 150mm (6") pipe, 170mm (7") long. Such an axial flow canister has a 3litre capacity. The cross sectional area is 28 sq. inches. Now consider the radial flow canister. Such a canister if it were to remain a 6' diameter with a 1 1/2" inner and 5" intermediate tube diameter, would need to be slightly longer (10") to have the same scrubber capacity. But the cross sectional area (if measured in the middle of the bed if calculated on a 1.625" radius pipe, 10" long) is roughly 100 sq. inches, or 3 times that of an axial design. That said, the author has had no difficulty with a 6" axial flow canister down to 280feet, provided the appropriate diluent (heliox/rich trimix) is used. Subjective resistance has been noted at 100 feet with the small mesh size Sofnolime with air diluent.
Advantages of Axial Flow:
- · Simple to manufacture
- · Very little chance of channeling, if the bed is packed in the same axis as the gas flow, as the variability of the density of the material is 90 degrees to the gas flow.
- · Higher work of breathing than radial designs (exception is the MK 16 style big bore design)
- · Difficult to incorporate hydrophobic membrane.
- · Low work of breathing
- · Provides a good place to add a hydrophobic membrane, around the outside of the second cylinder
- · Very prone to channeling, as the bed is packed perpendicular to the direction of the gas flow. Hence the gas tends to pass through the granules packed last, which are the least dense. Even if the canister is very well prepared, there will always be a tendency to settle in transit on a pounding boat.
- · Relatively difficult to manufacture
- · Requires extreme care in packing the scrubber (see 1st point)
Apparently, a big danger is if the sensors are at a lower temperature than the gas around them whilst this gas is saturated with water vapor. So it would not be a good idea to place the oxygen sensors in either breathing bag, as condensation occurs in both these locations, although the inhalation bag usually has a lot less condensation, during short bounce dives at least.
The Cis-Lunar Mk5 rebreather has all the sensor except the actual sensor face isolated from the re-circulating loop gas and temperature in a separate chamber. I believe this is to eliminate condensation occurring on the connections, and this is achieved I assume by having a hydrophobic membrane on the pressure equalisation pathway between the loop and sensor chamber. The designed orientation of the sensor faces avoids any resulting condensation accumulating over the face of the sensor, but the disadvantage of this system is the in built sensors themistor will be at a different temperature than the gas circulating in the breathing loop. The resulting oxygen reading error however is probably insignificant, but I would advise that new designs take this into account.
In any design however, if the resulting condensation on the sensors blocks the membrane, the sensor will read in the green regardless of the actual level of oxygen. This is a definite widow maker people.
The easy solution is vigilance whilst operating the unit. If you are using a manual unit, you will be alerted by static oxygen PP02 readings. If the readings are not changing with time, either a) you are already dead, b) the sensors have water on them, or c) both a&b. Unfortunately there is no such positive indicator on fully closed units, the users having to monitor that the solenoid fires regularly. Avoid rapidly increasing CO2 production whilst the canister is already cooking along (several hours into a dive) as this tends to produce the most water vapor in the canister. (2 byproducts of the chemical reaction are heat and water. At high workloads it is possible to make steam come out of the scrubber!)
Keeping the sensors at the same temp as the gas stream MAY prevent excessive condensation HOWEVER a rapid change in workload will spike gas temp and make the sensors an ideal condensation point due to thermal inertia. This problem has had literally MILLIONS of dollars thrown at it. Solutions exist such as heat exchangers, designed to drop humidity levels.** Holding these things down in physical size is the problem, whilst keeping them simple. One of the best places to position your sensors is in the canister, usually on the upper part, to use gravity to keep standing water at bay, and downstream of the bed.
Where to add diluent and Oxygen?
The oxygen is best added in a position that allows it to mix fully with the loop gas before it is inspired. For the manual oxygen add, this is often in the exhalation bag. The oxygen solenoid addition point is usually somewhere in the scrubber, and the sensible place to put this is upstream of the scrubber. This position allows the oxygen to mix before it reaches the oxygen sensors and the diver.
The buddy inspiration adds the oxygen directly next to the oxygen sensors, downstream of the scrubber. This has allowed them to have good control over the oxygen level, presumably because when the oxygen is added, it insantaneously spikes the sensors to stop a further oxygen injection when it is not needed. However good oxygen control I believe is not keeping the electronics happy but providing a homogenous breathing mixture to the diver.
There are alternatives to this crude method of oxygen control such as using a timer either software based or by something like a 555 timers in the electronics to allow the added oxygen to reach the sensors and change the setpoint before the solenoid is fired again.
I am also a bit of a luddite in that I believe if you are going to run electronic control, it should not be software based. In addition having an system like the biomarines where the oxygen added remains constant each time by using an accumulator would give me more confidence in my rig than not knowing how much oxygen the computer has decided to inject.
The diluent addition point is often placed in the inhalation bag, so that in an emergency you can breathe not from the loop gas but directly from your diluent tank. Other units place the diluent add over the sensor faces so only a little gas is wasted when sensor calibration is checked during the dive. However I don't mind doing a full loop flushthru on long dives every so often as it refreshes the whole loop, which allows you to not only check your sensors but also allows you to physiologically appraise the level of carbon dioxide or high/low oxygen levels independently of the sensors.
How to keep it all together?
Almost all rebreathers have a back cover that encases the canister, electronics breathing bags and supply cylinders. This may look good, but
apart from this, all it does is limit you to certain sized tanks. I also feel it actually increases drag, as the overall size is always larger than that contained within the case.
My approach to this problem is to have a cover that protects the vulnerable items only, leaving the tanks exposed. Thus any sized tanks can be used, without needing a modification to the cover. After all no-one covers open circuit tanks, why should they be protected just because it's a rebreather?
Things to avoid!
Direct injection of oxygen
The ability to add free-flow oxygen into your loop (deeper than 20-30 feet) is perilous indeed. You should think up a way to avoid the possibility of you making this error.
I use a restrictor on the oxygen add line, and rely on staged oxygen at 20 feet only for a source of free-flow oxygen.
Swimming pool rebreather genius:
These guys always come off as being in command of their surroundings. Their confidence level is amazing! This is by far the largest group of instructors (and some manufacturers) out there. Ask to see there logbook to show there experience level: eliminate all dives that can be done on a single 80 of air, all the swimming pool dives (this could take some time) all the dives below 100feet on a nitrox mix (as this is evidence of stupidity if done on a fully closed rebreather). Next eliminate all deep mix dives conducted in a chamber. With what's left, ask yourself if this guy has enough experience to pass on to justify what he is about to charge you.
Most of the reputable specialist manufacturers will have specified instructors they trust, as anything less would expose them to a high risk. Seek these instructors.
DEMA and BOOT
Garrett Weinberg, Hubert Stevie, Karl Kramer
Some interesting new items were reported at the DEMA(USA) and BOOT(Germany) dive shows.
At DEMA the Prism Topaz did appear. Carlton are saying June delivery. Steam Machines are taking hard deposits on the first delivery lot. Basic analog readouts - battery, sensor #1, sensor #2 and sensor #3.
Also, on the Halcyon machines the external cosmetics have been cleaned up, new bailout mouthpiece, and major cleanup inside. They also previewed the Halcyon 2, a smaller and cheaper version of the current machine.
Drager showed its little (unnamed) rebreather. Single orifice - max depth of 62 fsw -1 hour bottom time - upgradeable over time. Retail - US$1750 w/o oxygauge and US$2250 with oxygauge. These price points may seriously change the landscape of the recreational rebreather market.
At BOOT the new Draeger rig was also seen, a SCR with integrated O2 sensor (oxygauge) and breathing bags integrated in BC design. Retail price is suggested DM3800,-
Draeger has two new rebreathers, one is switchable between O2-CCR/Nitrox-SCR, the other (SCR), as reported above, looks Draeger-138 related and is still without name.
Electrolung Design II - Electronics
by Walter StarkUnlike galvanic sensors, polariographic electrodes don't generate electricity. Rather, the conductivity of the cell varies in the presence of oxygen. A bias potential from an external source is applied between anode and cathode and the resulting flow of current is a function of the molecular concentration of oxygen present. The current involved is very small so an Op Amp is used with each sensor to boost power to a level useful for control and monitoring. Hermetically sealed trim pots which incorporate an O-ring seal around the adjustment screw provide for zero and gain adjustment of each Op Amp thus enabling calibration.
The amplified signal is read out to a wrist display consisting of a stack of three edgewise panel meters. 100 microamp meters were used in conjunction with high resistance to prevent a possible short in this circuit from affecting the solenoid control. Mil Spec, so-called "shock resistant" meters were used. These resist minor bumps but still they won't stand up if you drop the display on a steel deck or concrete. In practice it wasn't a significant problem but occasionally a meter did require replacement. This was quick and easy to do.
The big advantage of this type of analog display is that you can tell at a glance everything you need to know. In use all you need to verify is that all of the readouts are in line with one another and at or a bit above the set point which was exactly mid scale. This kind of meter is also precise enough for calibration purposes. If I were doing it today I would look at bar type LCD or LED readouts for monitoring and perhaps a separate switchable numeric display for calibration. I would also seriously consider a miniature head up display in the mask instead of one on the wrist. I don't like numeric displays for monitoring as they entail reading and mentally comparing numbers which requires much more attention than just noticing if position and alignment are where they should be. Possibly some of the commercial RBs have already done all this.
The amplified signals from all three sensors were fed into a fourth Op Amp which in effect averaged them and used the resulting value to control the solenoid set point via a switching transistor. We used a fixed set point of 0.5 Atm PPO2 but it would be simple to add a trim pot to provide an adjustable set point. Clipping circuitry limited the input to the control Op Amp from each sensor to values corresponding to 0.25 and 0.75 Atm PPO2. If any one sensor began to read drastically different from the others its effect on automatic solenoid control was thus limited. Clipping came after the meter display thus they would continue to read true output even if the input to the control Op Amp was clipped. Clipping also activated an audible alarm. If the alarm sounded a glance at the meters would tell you what the situation was. If only one was off the other two would continue to exercise control. If all were high, low or different from one another you could use manual control while aborting the dive.
The Op Amps require a + and a - voltage power supply. This was supplied by a pair of 9V Manganese Alkaline transistor radio batteries. Bias to the sensors was provided from the same source via a voltage dividing resistor circuit. A second pair of the same batteries provided switchable backup power. A third pair used in parallel provided separate power for the solenoid.
The solenoid did not have backup as this is non-critical because manual control of O2 is easily effected. The snap terminals used for this type of battery were securely attached to a bulkhead. A screw adjusted base plate held the batteries firmly in place and against the terminals avoiding any possibility of a loose battery connection.
All the electronics were incorporated on a single circuit board about 4x5". This was mounted on one side of a longitudinal bulkhead in the electronics housing with the batteries and audible alarm on the other. This longitudinal bulkhead was itself mounted on a transverse bulkhead which separated the electronics compartment from a plenum above the absorbent canister. The solenoid and sensors were mounted on the opposite side of this transverse bulkhead thus everything electrical other than the wrist display was immediately adjacent to each other.
In the units I made all of the electronic components were on a printed circuit board. After assembly the boards were coated with a spray-on waterproofing compound as is widely used for marine electronics. At Beckman the components were assembled into 4 micro- welded epoxy potted modules which plugged into gold plated sockets on the circuit board. In theory this is a better way to go but in practice it didn't make any noticeable difference.
With respect to reliability of electronics in this kind of application. Recently someone posed the question of when was the last time your TV failed to which Robert made the wonderful reply, "The last time I took the bastard underwater." Both comments reflect important points. Electronics in themselves can be extremely reliable. In terms of MTBF, far more reliable than most mechanical devices. Enough so that they can be trusted for things like passenger aircraft control systems where thousands of systems are in everyday use and a single failure means the loss of hundred of lives. But Robert is right too. If you flood them with water they fail.
The problem then is really a mechanical one. Can electronics be reliably enclosed so as to prevent flooding in underwater use. If it were solely a matter of constructing a watertight pressure proof housing for the electronics that alone wouldn't be too hard. Unfortunately there is also the matter of connections for sensors, displays, a solenoid, and a switch plus keeping all these external devices themselves dry. The possibilities for leaks begins to multiply. With a great deal of care in construction and use, high reliability is achievable but I think there is a much easier way to reliably keep out the water.
The key to the solution is pressure. Keeping things watertight under 100-200 psi is difficult. Doing it under 0.5-1 psi is easy. In the Electrolung everything was at ambient pressure. The electronics compartment was vented via a small canister of silica jell with the rest of the system. A standpipe for the vent orifice prevented any accumulated moisture in the canister plenum from being pushed into the electronics compartment. In anything but a head down position the electronics were above the counterlung thus any leak would normally result in gas escaping rather than water coming in. In practice with the kinds of seals involved and the very low pressure differentials leakage anywhere in the electronics section was never a problem.
Humidity and condensation were non-problems. Plastic construction probably helped in avoiding the latter and the waterproof coating seems to be quite sufficient for the former as is well attested by a wide array of complex devices and vast usage experience in the marine electronics industry.
The only practical way to get your TV underwater with this type of system is to flood the entire system. This is inherently no more likely nor any more or less disastrous than it would be with any other rebreather regardless of type.
BUDDY INSPIRATION DIVES R.M.S. NIAGARA.
by David ApperleyMany people would have seen the popular documentary, "Niagara gold" which has recently been shown on television (in Oz). It was this & persistent harassment from a Welsh friend of mine, Tim Cashman, now living in New Zealand, that brought about our attempt to dive the famous shipwreck.
I had first come to know Tim on a cave diving trip in N.Z. 2yrs ago, where I realised his passion for wrecks. After diving what I believe to be one of the best cave sites in N.Z. & Oz, Tim's comment was " What's in this cave diving? You see the same at the bottom as what's at the top. Bloody rocks!!!". With comments like these I knew I could never sway his preference away from wrecks.
The Niagara, which Tim has been researching for the past two years was a liner built for the Union shipping company & operated a mail & passenger service between Canada & Australia/ New Zealand. This was a ship of world class, with 1st, 2nd & 3rd class sections; her dimensions were 524 feet long, 66feet beam, & 34.5 feet draft. Definitely a luxury vessel, the Niagara was nicknamed, " THE TITANIC OF THE PACIFIC", however with the loss of that ship this nickname was used less & less. At the time of her sinking, the Niagara had completed more Trans Pacific crossings than any other vessel. Her cargo on these trips was general in nature, such as mail bound for the U.S., Tahiti & Honolulu. Many immigrants traveled on a one way voyage to Australia & New Zealand.
On the fateful journey there was one other piece of cargo, 8 TONNES OF GOLD BULLION. This particular trip the Niagara was transporting this gold on behalf of The Bank of England from Australia to Vancouver. It was stowed in a strong room just forward of the bridge & about 3 levels down from the deck. After leaving Auckland Harbour on April 24 1940, the Niagara struck a mine laid by German U-boats approx. 70 nautical miles north east of her departure point. Although it took only 2-½ hrs for the vessel to come to rest on the ocean floor at approx. 400feet, all passengers & crew were safely in lifeboats & back on shore by the next morning.
The following salvage operation for the gold bullion is an incredible story & is documented in various books such as "Niagara gold" & " Gold from the sea". Using an invention, which had been only trialed once or twice in Europe, the Captain & crew of a vessel named the "Claymore" set about recovering the gold from the wreck. The invention being a one-man observation chamber which was lowered down to the wreck where the person inside could observe & direct placement of explosives to open up the hull to gain access to the strong room. This job was given to a diver named John Johnstone. This man would venture down 400 odd feet in this 1 atmosphere chamber with his only life support being a very primitive oxygen rebreather. The enormity of just getting Mr. Johnstone down & back up from the wreck was a feat in itself. Remember, this was 1940!! So Today, I found it ironic that of the first 2 free swimming divers to descend on the Niagara some 50 yrs later, I would be using a relatively new invention to the recreational diver, the Inspiration closed circuit rebreather.
The Buddy Inspiration closed circuit rebreather, in my opinion is the best, readily available, closed circuit unit on the market today. While, rebreather design is fairly simplistic, many manufacturers have added extra features, such as redundant units, decompression computers, head up warning displays etc. With the Inspiration, AP Valves has adopted the K.I.S.S. principle, & only added a few features to add to diver awareness & safety.
The unit consists of an inhalation breathing bag, an exhalation bag, (both front mounted), a carbon dioxide scrubber canister, 3 oxygen sensors & a LCD digital screen for 02 readouts. Mounted on the front of the breathing bags is an 02 addition button & a diluent* button. This makes a very simple closed circuit mixed gas rebreather. In addition to these features the Inspiration allows for automatic maintaining of 02 setpoint* by an oxygen solenoid which is controlled by a computer in the LCD handset. The way this is done is by simply monitoring all 3 oxygen sensors & taking the readings from the 2 that are the closest together & ignoring the third. When the oxygen in the breathing loop* drops below the setpoint, oxygen is added through the solenoid. The reason for 3 02 sensors may be obvious, if only one is used then the computer & diver will assume it is accurate & add 02 accordingly. Should this sensor not be correct then the diver may end up breathing a hypoxic* or hyperoxic* mixture. This is not conducive to the diver staying alive. If 2 02 sensors are used then the computer & diver do not know which sensor to believe should they be different. Therefore, 3 02 sensors allow both diver & computer to monitor all 3 sensors and can ignore one should it start to differ.
Due to the fact that the oxygen content in a mixed gas rebreather is dynamic rather than static( that is; the fraction of oxygen in the breathing loop changes constantly with any change in depth) there is a chance of exceeding the oxygen tolerance limits. The Inspiration has one other important feature; an audible warning buzzer coupled with a visual readable display to warn the diver when limits are exceeded. The LCD display will flash a message " LOW OXYGEN" & the buzzer sound if the partial pressure of 02 drops below 0.4 atm. This gives the diver maximum warning before he reaches the hypoxic threshold of approx. .16atm. Similarly, if the partial pressure increases above 1.6atm then the display will flash " HIGH OXYGEN" & the buzzer sound.
At this stage you are probably thinking; "Great, providing the computer is working properly". The Inspiration has a secondary slave computer that also monitors the 02 content. Should there be a fault in the master control unit then it can be compared by the diver to the slave. There are only 2 control units you say, which one does the diver believe? During rebreather training & in the continuing education process that every rebreather diver must maintain, it is learnt that there are always constants that can be relied on. For example, on a dive to 100mtrs I check my master control display & find all the sensors reading .9atm . I look at my slave control unit & find all the sensor readings to be 1.1atm. Which one do I believe to be correct? Before the dive I have tested my diluent gas & found it to be a 10% 02 content mix. Through the use of Dalton's law (before the dive) I know that if I flush* the unit with diluent gas my correct 02 sensor reading should be approx. 1.1atm. In this scenario I would manually switch to the slave control unit & allow it to control my 02 addition. The other scenario on a dive like this may be that neither control unit is reading the correct partial pressure. Rebreather divers are taught that in this scenario, a bailout in semi-closed* mode would be the next course of action.
As you can see, a failure on a rebreather does not necessarily mean a major catastrophe. With scuba equipment we realise that equipment failures underwater are not the end of the world, regulator free flows, blown o-rings etc, can be dealt with effectively through redundant gas systems. As with rebreather diving, there are usually 3 or 4 emergency options for the diver to choose from, before having to completely bail-out to an open circuit regulator supply. One of the golden rules of rebreather diving, ALWAYS CARRY ENOUGH OPEN CIRCUIT GAS TO SAFELY ASCEND & DECOMPRESS.
With these scenarios & others covered, it was time to dive the wreck. After being held up for 5 days due to 4 cyclones in the area (not 1 but 4!!), Tim & myself finally saw our window. With only 3 people being part of the dive team (the rest had given up any hope of diving) & the rest being spectators & ROV operators, we motored out of Tutukaka Heads to be met by a 2-3mtr rolling swell. The dive vessel we had chosen was a boat called "Reel Passion", a 14mtr cat with 5mtr beam & twin 370 HP Volvos. It loved the swell & made what I thought would be an unpleasant ride into one of comfort. The swell was dropping by the minute with a light souwesterly breeze & by the time we arrived at the wreck I started to believe that we were going to get a dive in. After only about 15 minutes of sounding up & down the wreck, the order was given to drop the shotline* in. According to our calculations, the shot was on the stern. We decided to try & move it further up towards amidships but could not get it out. It was hooked into the wreck somewhere, that was good enough for me.
The next hour or so was spent putting the ROV in the water. Keith Gordon, the owner & operator, carefully guided it down through the incredibly blue water to the Niagara. He came upon the wreck at the bow end & almost immediately came across the forward mast, not on the sand but sticking perfectly horizontally from the deck. Slowly moving up the mast to the crow's nest, still in place.
The ROV had only been on the bottom 10 minutes, & that was all Tim could take. He looked at me & walked straight outside to commence gearing up. (I wasn't that far behind him).
For those of you who are thinking that rebreather diving means, you don't have to carry much equipment; you couldn't be further from the truth. My Inspiration had been modified to accept two 7-litre cylinders as opposed to the standard 3 litres. Along with this, I was to carry three 12-litre cylinders with open circuit regs just for decompression purposes should the rebreather have a major malfunction.
Having strapped & clipped all this gas on, I entered the water & remained on the surface to pre-breathe* the unit before beginning the dive. Tim, while diving on open circuit, had basically the same configuration with two 12 litres for bottom gas & three 12litres for decompression gas. Our bottom gas of choice was a Heliair* 9% O2 57% He which gave Tim a PO2 of approx. 1.2atm. Using the rebreather I decided to run my PO2 setpoint at 1.3atm. The other difference between Tim's & my dive profile was that I would be breathing a Helium mixture all the way down & all the way back up again to 6mtrs. I can here all the Trimix divers out there saying " NO, Your decompression will be too long!!" Remember, the rebreather will hold the PO2 of oxygen @ 1.3atm for the whole dive so I don't have to be swapping to high PO2 gasses on the way up.
So, we are finally off on our dive, descending effortlessly down a near vertical shotline. At 50mtrs Tim stopped to swap to his bottom gas from air. I turned to my left to stare into the Blue water through which we were descending, to be pleasantly startled by four or five, metre plus kingfish circling. Upon looking down again I saw another 3 coming up the shotline. These three were not casually swimming up, but almost "bolting" to see who we were. As we made our descent they circled all the way down to until the wreck started to come into view. It first came into view at about 80 mtrs, the most distinct features being its huge size, & the second being rows & rows of portholes as far as the eye could see. The whole stern, from docking bridge back was covered in trawlers fishing nets. Lying on its port side, the Niagara had suffered very little in its retired years. The first two levels of super-structure reasonably broken up, mainly due to the fact that they were originally constructed of wood. Easy penetration through these sections was possible as several large sections of walls had fallen away allowing ample ambient light in. The main concern, as we swam slowly along these corridors was the large amount of net 10 –15 feet above us. It meant exit from this area would always have to be out to the side. As we approached an open area at deck level, a huge hole loomed in the deck of the ship. I swam toward it, instinctively reaching for my reel. As I approached I realised the enormity of the hull of the ship. The UK600 torch that I carried did not find floor or walls when I shone it through the hole. With reel in hand, I checked my time, 9 mins, enough time for a quick look. It was just then that it hit me, I was at 110 mtrs on a closed circuit rebreather, which I had never had at this depth before. With an equivalent narcotic depth of 41mtrs, the clear headedness that I felt had, for an instant, brought on a feeling of complacency, I did not feel like I was at 110mtrs, everything was just perfect. It did not take much time to reclip the reel to my rig & turn away from the tempting penetration. Tim meanwhile had found himself a beautiful fully intact deck light. It was semi- spherical in shape with completely uncracked frosted glass. Protecting it, was a decorative brass cage. I could hear Tim shouting through his reg, "Where's my tool bag?" I still don't know if he'd had tools, whether he would have bothered with such trivial treasure when there were telegraphs, binnacles, & bells to be found all over the wreck.
Time was fast working against us, as we'd only planned a 15minute-bottom time for our dive on the wreck. We turned to return to the shot & commence our ascent. Tim described afterwards, that it was at this point where he looked up to see the remains of the docking bridge off to his left. He said he decided against going in this direction, as our bottom time was 14mins. This turned out to be a disappointment because as we commenced our ascent outlines of what looked like the stern telegraph could be seen (we won't know 'till next trip).
Our ascent to the first decompression stop was short, as the first stop was 78mtrs. Only a short stop of 1 minute before we were on our way again. All our deep stops were of the same interval, & it wasn't until approx. 30mtr mark that I could settle in for the 100-minute decompression obligation that we had accumulated. The whole deco was fairly uneventful except for the embarrassing moment I had around the 21mtr stop. I was signaling Tim about something I had seen on the wreck when I turned back towards the shotline which I had contact with. My whole field of vision was taken up by tiny bright orange dots. My immediate thought was of the onset of oxygen toxicity. Instinctively looking down for the diluent flush button, the dots went away. When I looked back they reappeared. To my relief, the cause was flouro orange paint on the shotline that was rubbing off. My major mistake was communicating my previous thoughts to Tim who nearly choked while laughing so hard at my stupidity.
After completing deco I unclipped all equipment & it was hauled into the chase boat by our ever efficient & reliable surface support, Brian. Chris Ash, one of "Reel Passion's" crew could only mutter " You guys are insane, bloody insane " as I climbed back into the inflatable. My visions of him dragging a live 4mtr Mako shark into his boat brought on basically the same line of thought. It was all relative I explained to him.
Tim completed his decompression approx. 20 minutes later, dumped his equipment to the inflatable & exited straight into the big boat. He was met with a barrage of cameras, Dictaphones & a thousand questions from those on board. He described the dive as best as possible to all those eager to record this event which we believed was not such a big deal but to the Kiwis, was an historic moment. This was unfortunately the only chance we had to dive the Niagara as the rotton weather set in again that night. A special word of thanks is appropriate to those who helped make this dive possible;
1: Tim Cashman- for having the persistence to organise the whole trip 2: Keith Gordon- for spending considerable time & finance in gaining access to the wreck 3: Brian- for his organisation & running of entire dive operations 3: Air Liquide- Sponsorship through supply of diving special gases 4: Poseidon Diving Services New Zealand- Sponsorship through supply deep diving equipment 5: Reel Passion Charters- Sponsorship through special charter rates.
Recommended Reading
submitted by Jason RogersAt several places along the climbing route, according to Krakauer, the three climbers had come to a dead stop, not because of any difficulties or problems, but because Hall had instructed his climbers "for the first half of the summit day" not to put any more than one hundred meters between themselves "until" they reached the Balcony, a cleft at the base of the Southeast Ridge at about 8,500 meters. Krakauer, accustomed to independence of action as a climber, has said that he was frustrated at having his decisions tied to the lowest common denominators of the climb, but he felt his position as a client had "forced" him to give up his personal commitment to sef-reliance and independent decision-making, to become a tin soldier.
The differences between Hall's and Fischer's philosophies of guiding were emblematic of an ongoing debate between practitioners in the adventure travel industry. The camps of belief can be roughly divided between the "situationalists" and the "legalists." The situationalists argue that in leading a risky adventure no system of rules can adequately cover every situation that might arise, and they argue that rules on some occasions should be subordinated to unique demands that present themselves. The legalist, believing that rules can substantially reduce the possibility of bad decisions being made, ask that personal freedom take a backseat.
Critics of the legalist philosophy argue that an omniscient, rule-based position that minimizes independent action is being promulgated largely our to fear of bad publicity or lawsuits that might result from a lack of demonstrable "responsibility." These critics find it confoundingly odd that an industry that promotes the values of personal freedom and initiative would expound a philosophy that minimizes the pursuit of these very values.
Anatoli Boukreev and G. Weston DeWalt, The Climb, 1997
Please Note
The A.A.R.G. is dedicated to the dissemination of information about rebreathers and rebreather diving, particularly in Australia and the South Pacific region. Our aim is to increase the general diving publics' awareness about rebreathers and related issues and to provide you with the stimulus to make your rebreather diving safer. However NO responsibility is taken for the accuracy of any information presented in this newsletter. You should always seek out verification of any information you acquire about rebreathers and use your own judgment as to it's validity to your context. Be safe, be conservative and dive safe. Remember, this is not diving equipment, this is life support equipment and your life may depend on it.
Ask the A.A.R.G.

Click here to go  Back to Main Page
by Scott Leimroth ©